Altair ADC Atmospheric Dispersion Corrector
Altair ADC Atmospheric Dispersion Corrector
Altair Atmospheric Dispersion Corrector for planetary and lunar imaging or observing.
The ADC corrects for atmospheric dispersion (rainbow effect) producing sharper images of object closer to the horizon.
Particularly useful on Mars, Saturn, Jupiter and the moon at about 20-40 degrees altitude which.
The prisms are high quality K9 glass with broadband multicoatings and a prism angle of 2.5° which gives a maximum deviation angle of 5°, which is ideal for the UK, Europe and North America.
The rear side has 1.25" pushfit adapter with 3x thumbscrews and internal compression ring to protect your Altair or other CMOS cameras and eyepieces. The pushfit adapter can be unscrewed to reveal a T-Thread for direct camera connection. The nosepiece is threaded for filters.
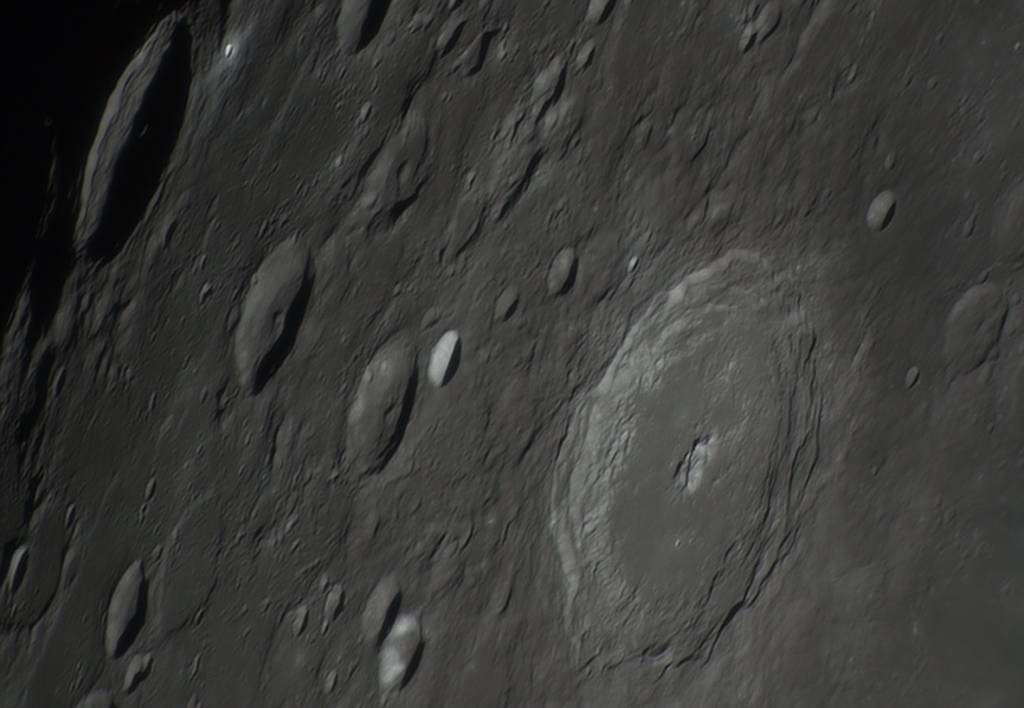
This is a high quality accessory as the images by Mr Neil Phillipson of the Langrenus area on the moon will attest (click thumbnails for full resolution).
The unit has a rotating lockable scale, so you can record your optimum settings.
Instructions and tips for using the Altair ADC:
Step 1: Learn what atmospheric dispersion looks like We have included and "before and after adjustment" image in the product images which is worth viewing. Firstly, examine the image of the target object in the video preview window. You should see a subtle "rainbow effect" on objects below an altitude of 40 degrees above the horizon. This effect is increased the closer you get to the horizon until it's very obvious. To see the "rainbow effect" more clearly it is recommended to increase the saturation control of your camera (this feature is found under the "Colour Adjustment" menu in AltairCapture and other image capture software and it will not affect the final image provided you are imaging in RAW mode recording .SER files which is the best setting for solar system imaging). Because adjustment of the prisms offsets the image slightly, it helps to zoom in (mouse wheel in AltairCapture) to see it more clearly while starting at lower powers then moving to higher powers - look along the border of high contrast features on the moon and the edge of planets to see the effect more clearly.
Step2: Learn to orientate the unit with the horizon line. Click here for ADC instructions. (new window)
Step 3: Learn to adjust. Move the levers together or apart, to change the divergence angle of the prisms relative to each other. By changing the angle of deviation, you will get a feel for the optimum position by viewing the target object in preview mode. Once you are satisfied with the image, and the "rainbow" effect is cancelled out, your prisms are set. The prism levers overlap so that most of the time you won't need to rotate the ADC itself, however you may need to rotate it a little to accommodate the overlap, which is as large as it can be without causing the body of the ADC to flex too much. Be patient. It takes a little time to get the feel of an ADC, possibly a session or two, however the results are well worth it and they are far higher quality than attempting to align the colour channels in post processing software because you are starting with a better image. We recommend putting the barlow lens in front of the ADC in most situations as the prisms will perform better at highre focal ratios used in solar system imaging.
Product features
Product features
Share
Couldn't load pickup availability